Your first app in App Studio
In about ten minutes you go from an empty App Studio to a small app with a record type, a process, a view and a running preview. The app is Client Sign-off: a design agency takes a deliverable through internal review and client sign-off. Signing and publishing are the subject of Test and publish from the Studio, and the details of processes and automations are in Processes, roles and automations.
What you need
- A workspace administrator. The App Studio entry in the dock is for administrators only.
- A plan that includes it. App Studio is an add-on on Pro and included in Business. If the plan does not include it, App Studio is not offered in the dock and groupforce refuses drafts, previews and publishing with a message naming the plan. Publishing a package and asking for a publisher certificate also need the Pro or Business plan. Installing apps, by contrast, is open to every plan. The prices are in the pricing guide.
- A browser. Nothing to install; the key you sign with is made in the browser later (Test and publish from the Studio).
Previews must be set up on the server; if they are not, the Test & publish part says “Previews are not set up on this server. Ask your operator.”
Open App Studio and start a new app
- Open App Studio from the dock. Its home lists what the workspace runs: apps built here, apps installed, and “Available from this server”. At the top right are Publishing key, Import a package and + New app.
- Click + New app. The page asks “What should your team be able to do?” and offers four templates (figure below).
- Click Approval process: “Requests that go through review steps with named approvers.” It brings one model and five states.
- In the dialog New app from Approval process type the Name, Client Sign-off. App Studio proposes the Id from the name and the workspace:
com.larkspur.client-sign-off. Click Create.
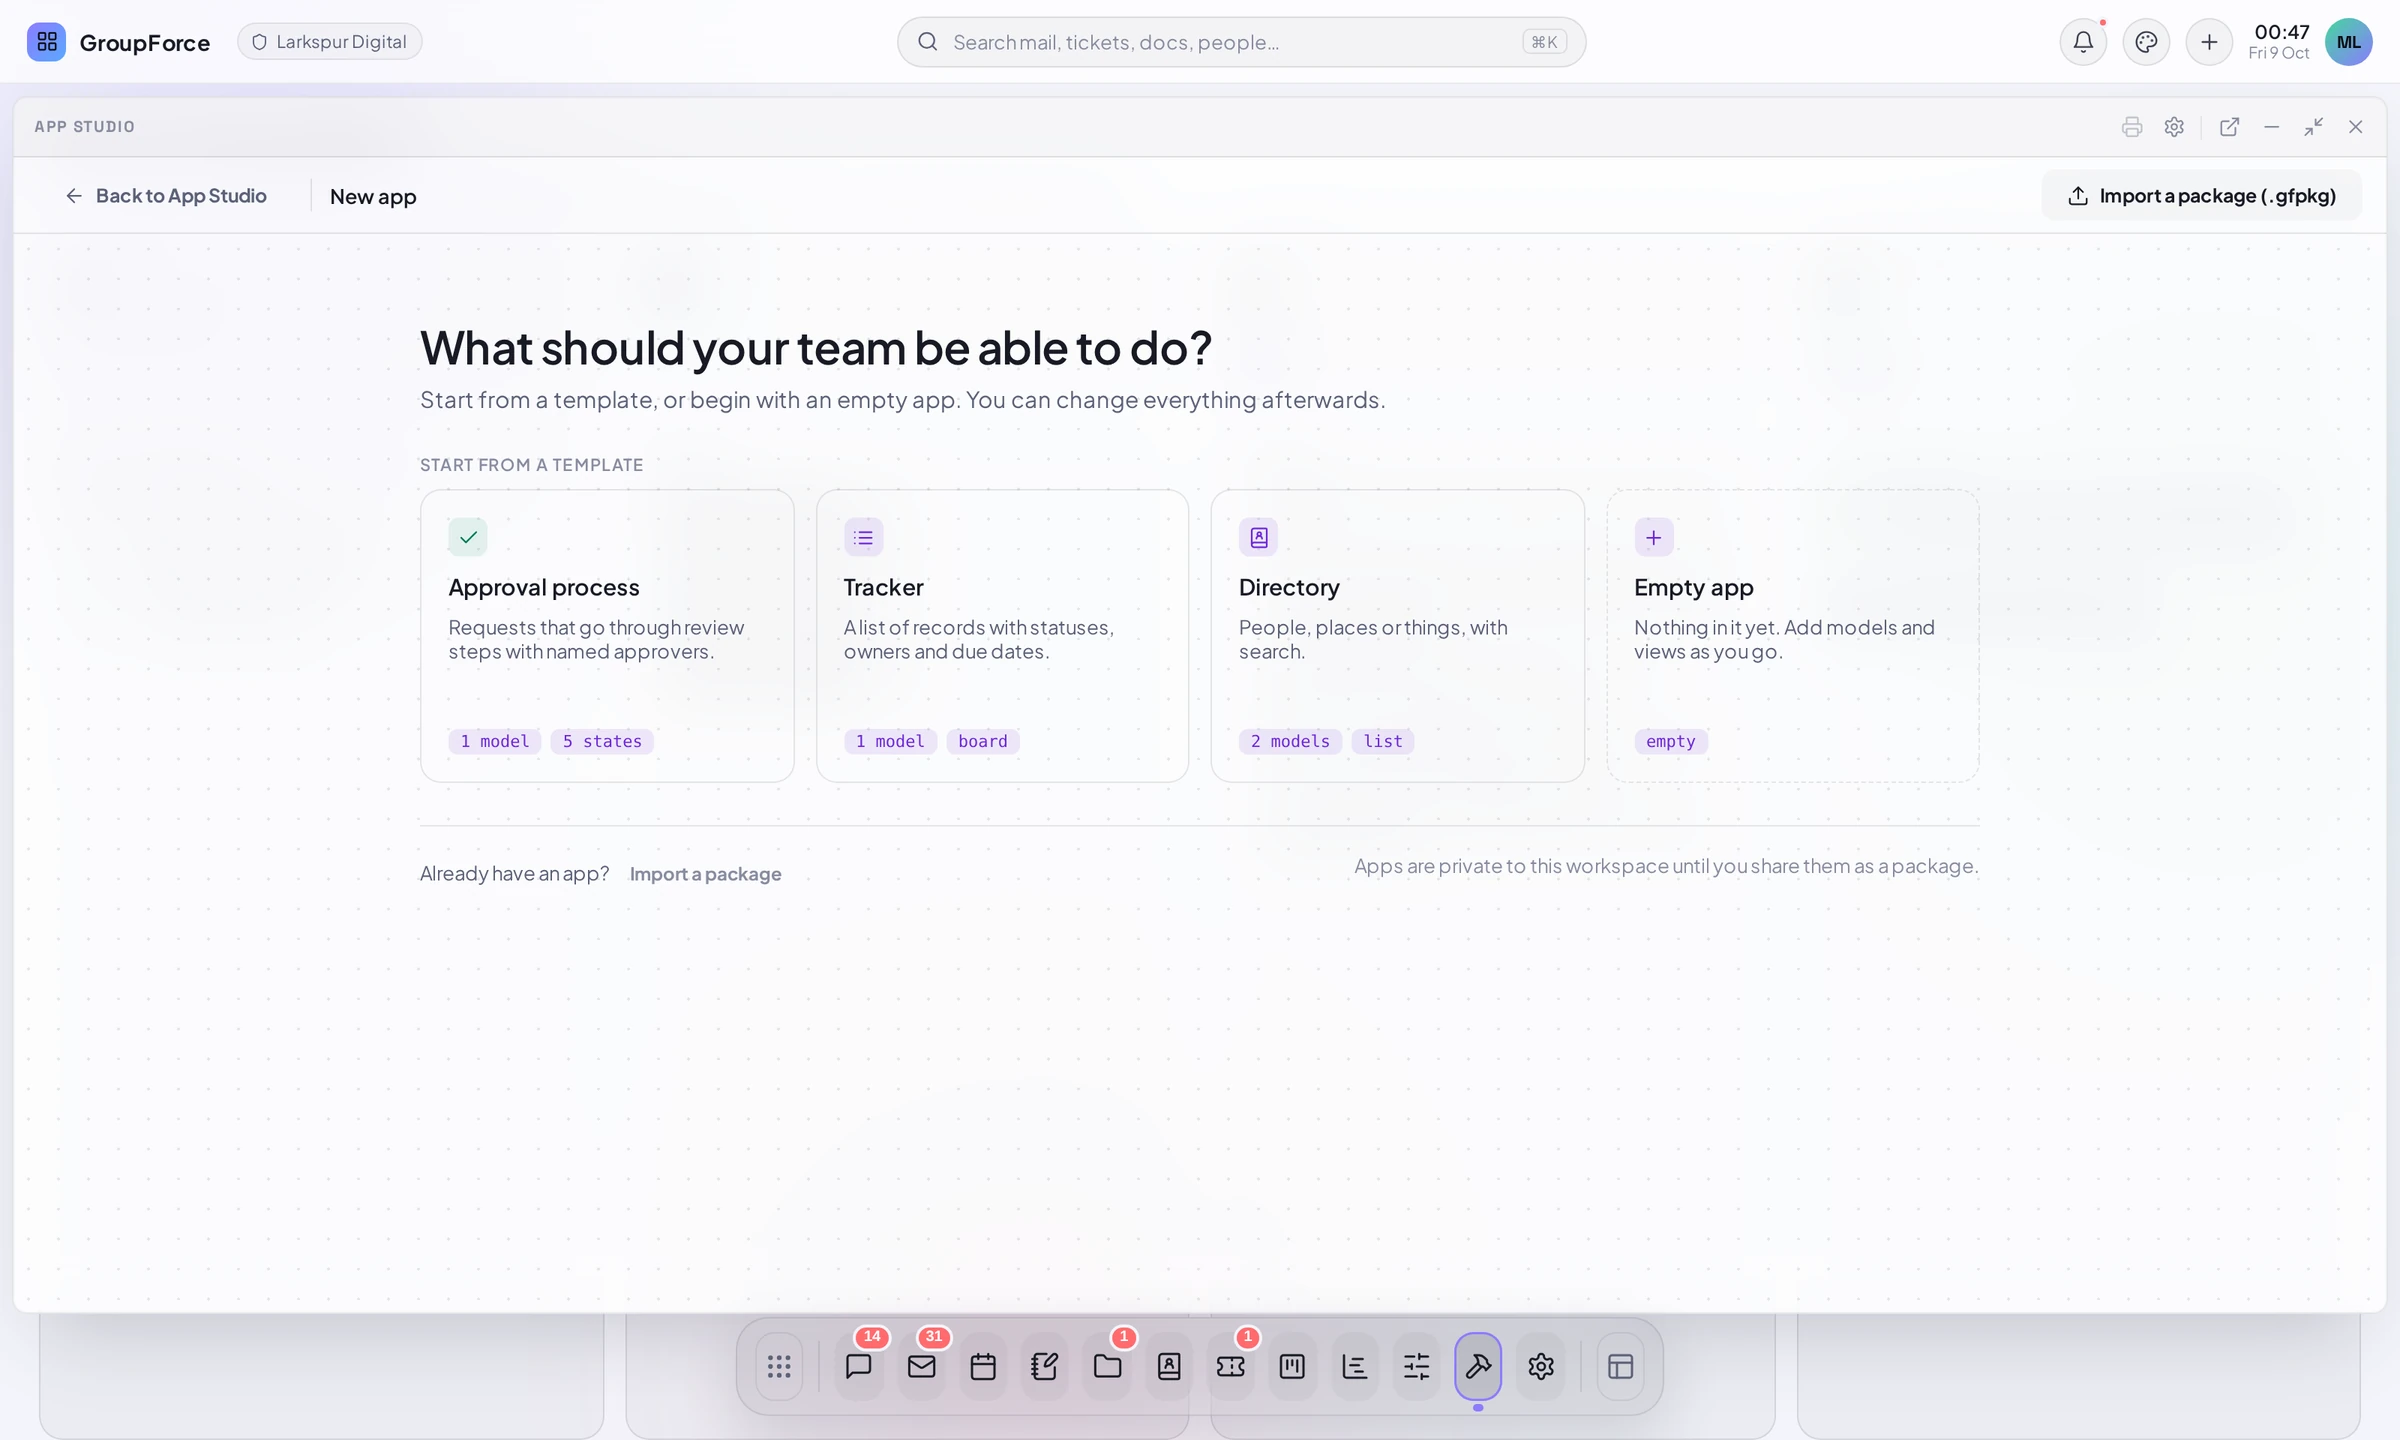
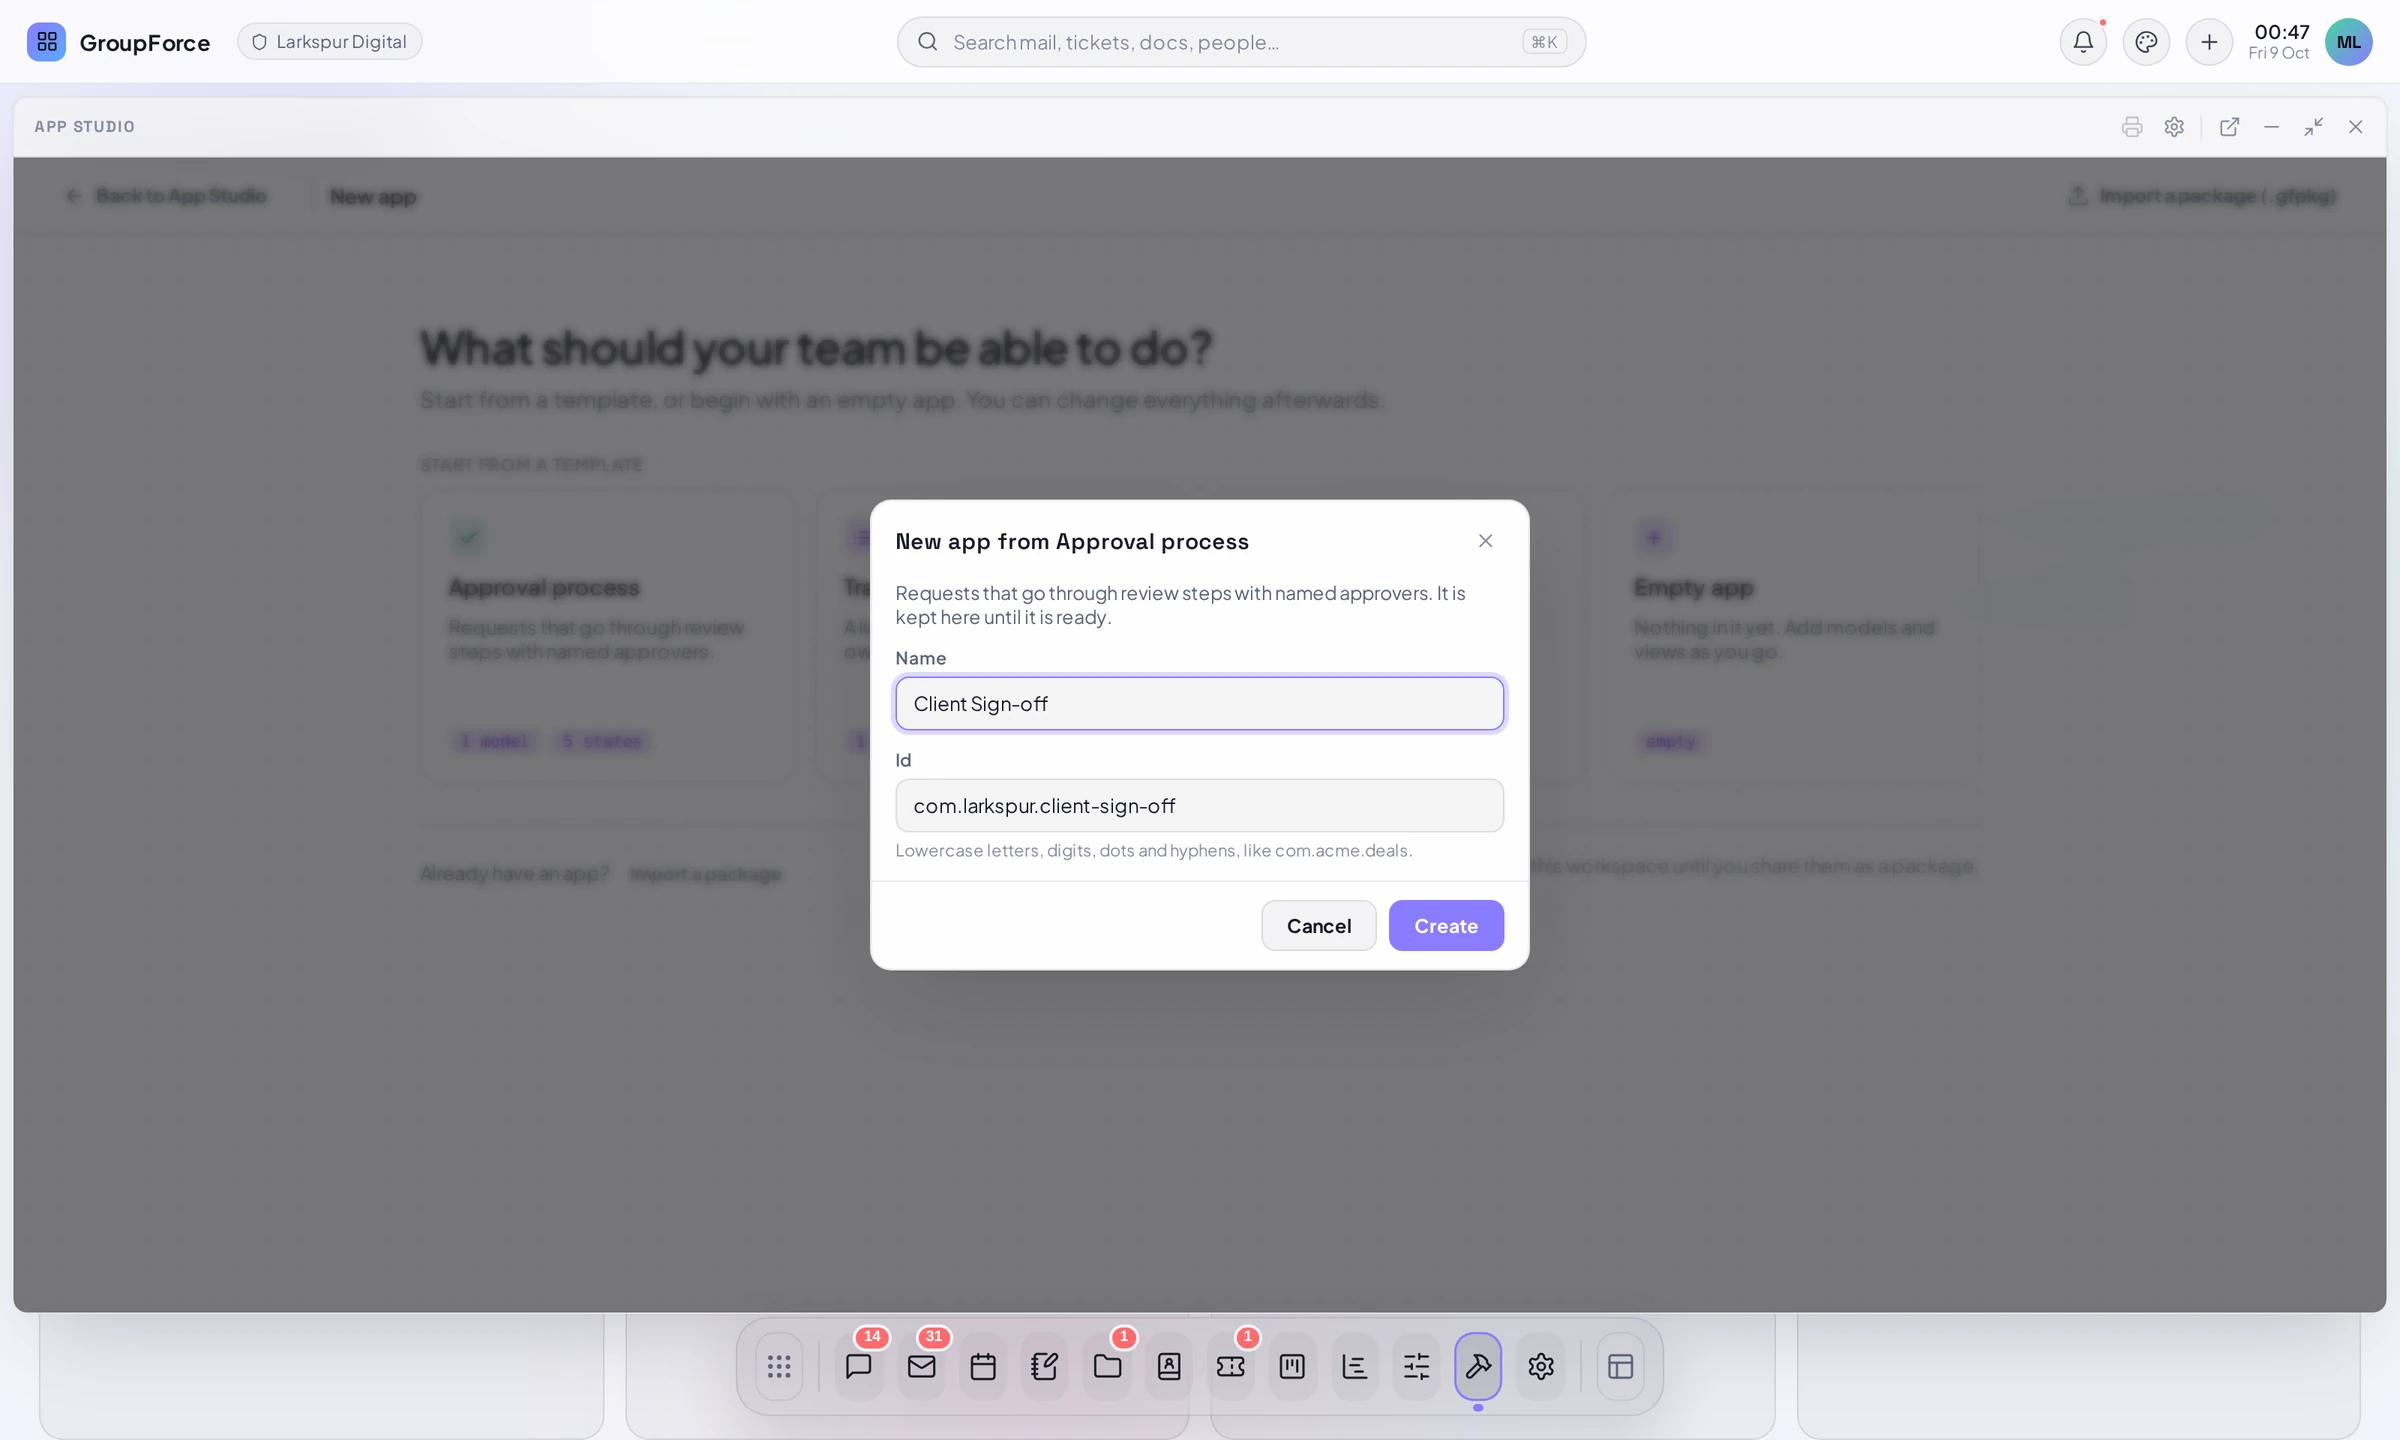
The templates are real starting points, not pictures: each except Empty app is a starter manifest with a view, and you can change everything afterwards. An app built here is private to the workspace until you share it as a package. The id is what the signing certificate must cover later (its namespace), so choose it with that in mind.
What the Overview shows
The app opens on its Overview. At the left is the list of parts in two groups, Build (Data, Views, Processes, Automations, Actions) and Govern (Roles & access, Settings, Printing, Server code, Test & publish), with Versions at the foot. Small numbers count what each part holds.
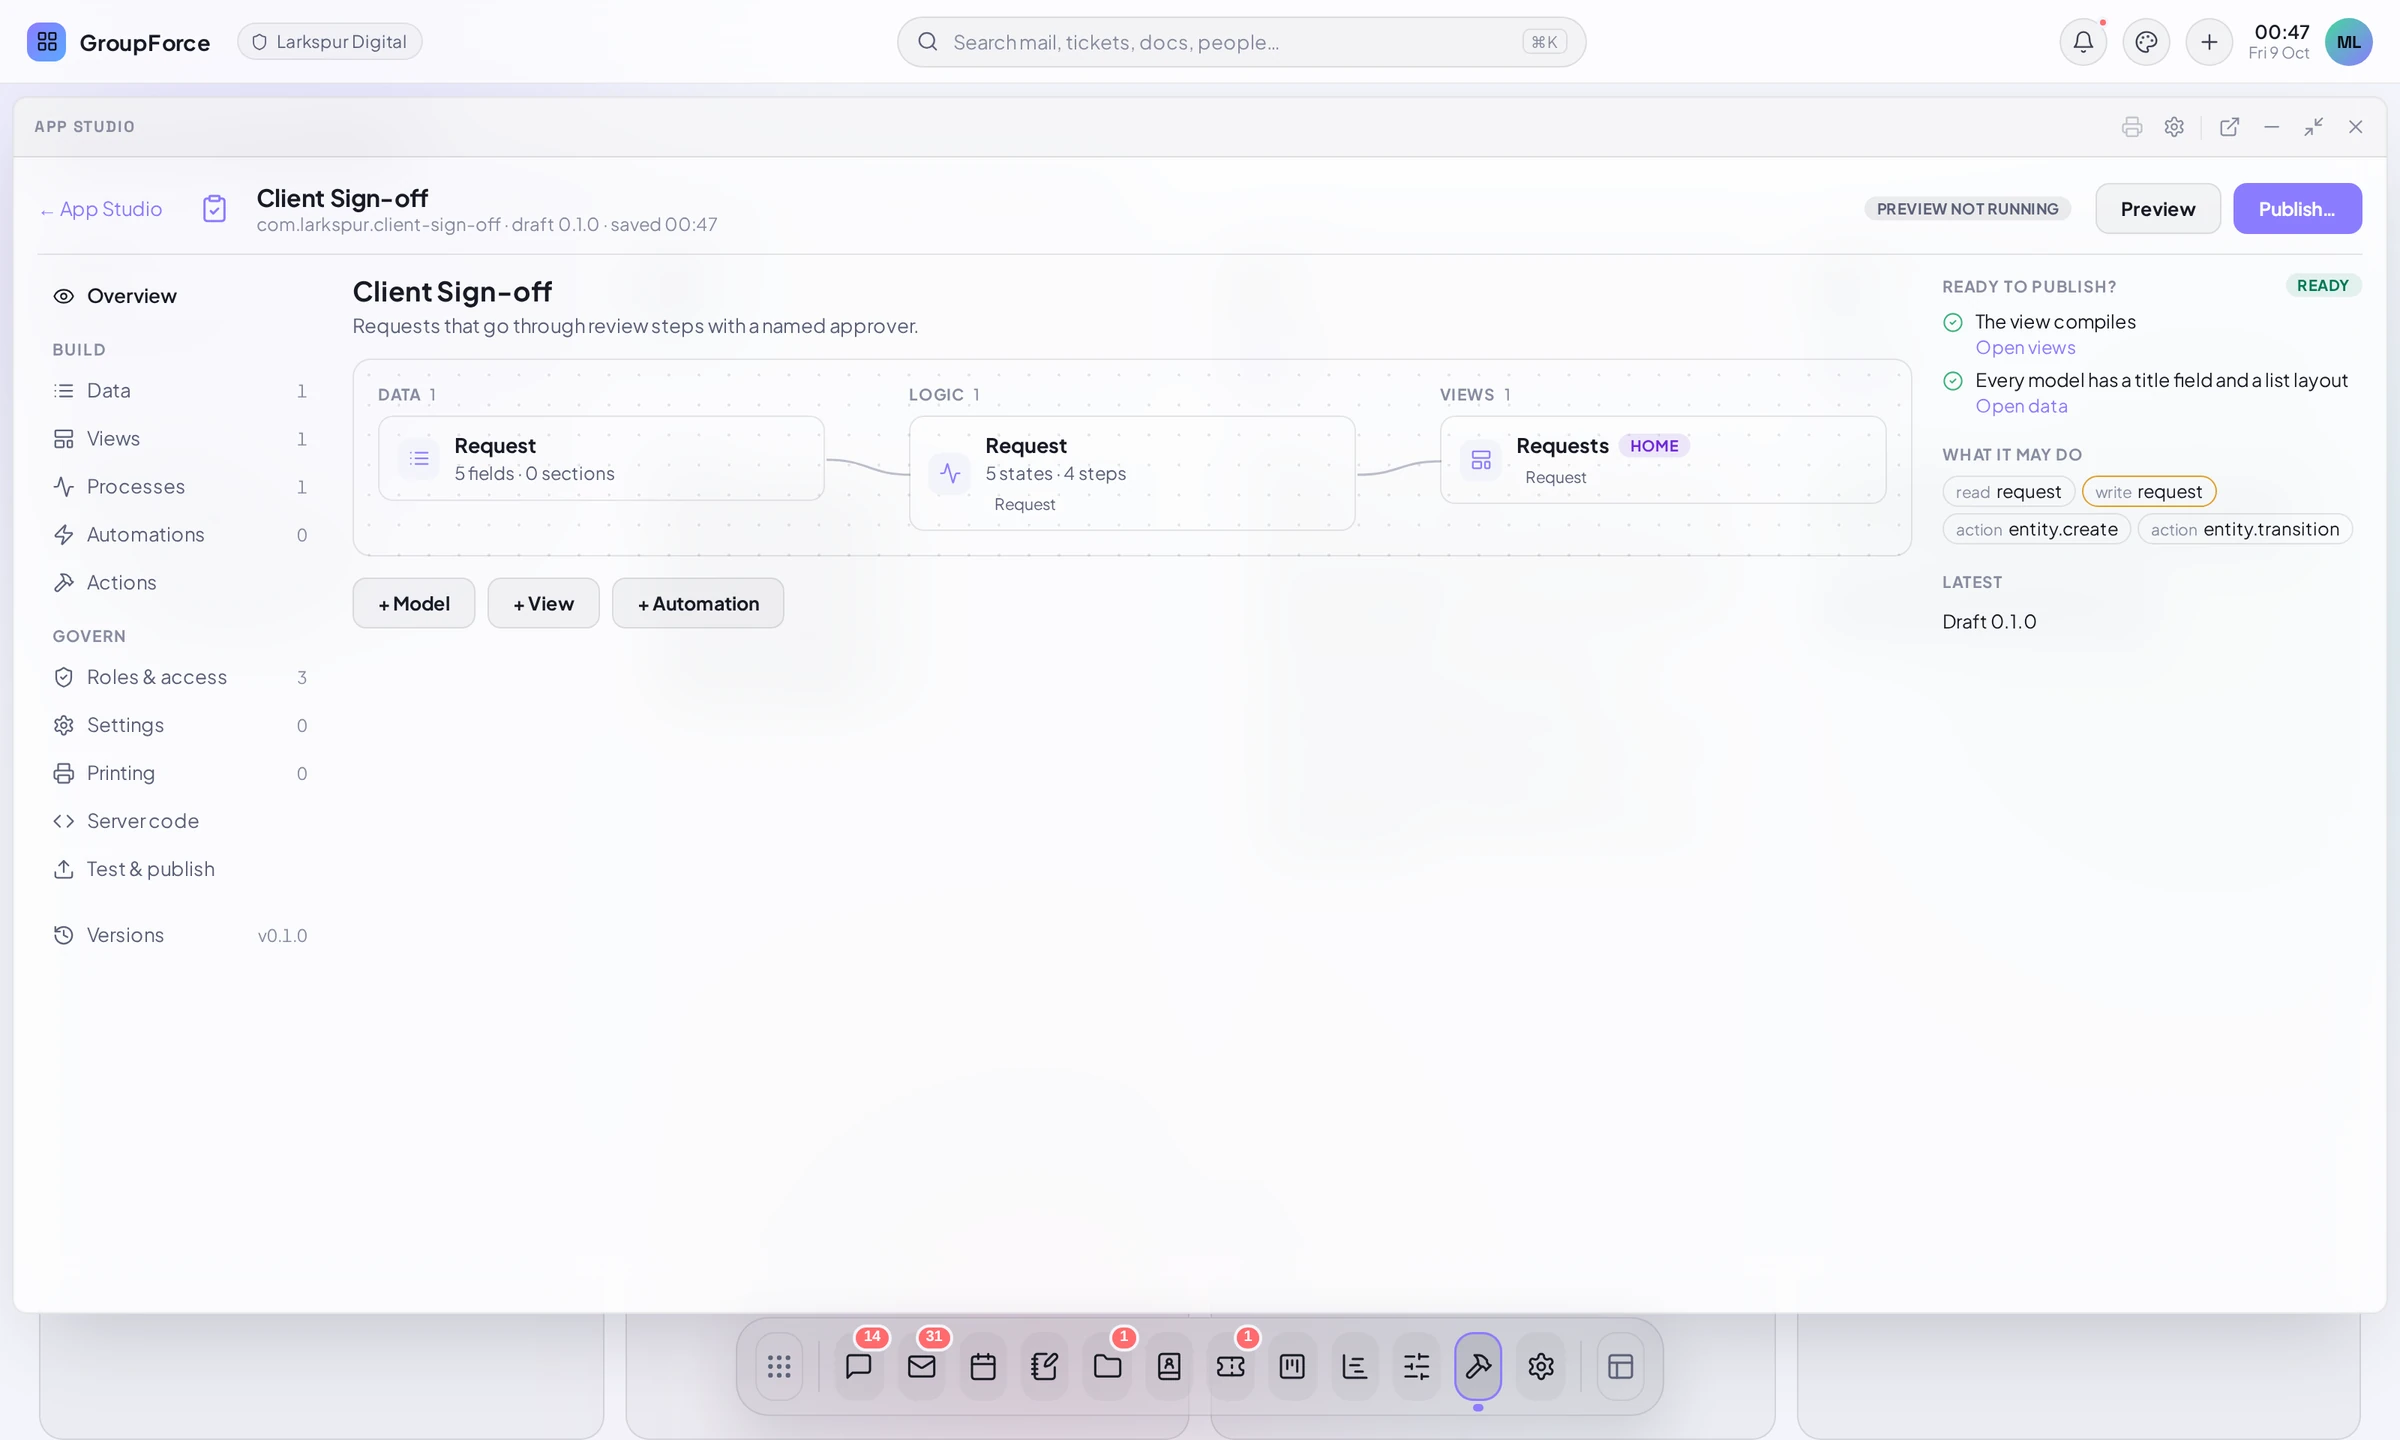
- The map reads left to right: the model (Data), the process on it (Logic) and the views that show it. HOME marks the view the app’s icon opens.
- Ready to publish? lists the checks, for example “The view compiles” and “Every model has a title field and a list layout”, each with a link to the part that fixes it.
- What it may do shows what the app will be allowed to read and change, and the actions it runs. You never type this: it follows from your views.
- The three buttons + Model, + View and + Automation are shortcuts to the parts.
Everything you do in a part is saved as you go into the app’s manifest and files. What you build is a draft; it is not installed anywhere until you preview or publish it.
Shape the record type
The template’s model is called Request. Open Data. The list at the left (“MODELS”) shows it with its field count; at the right there are three tabs, Fields, List and Settings, and a LIVE FORM that redraws as you edit (“follows your sections”).
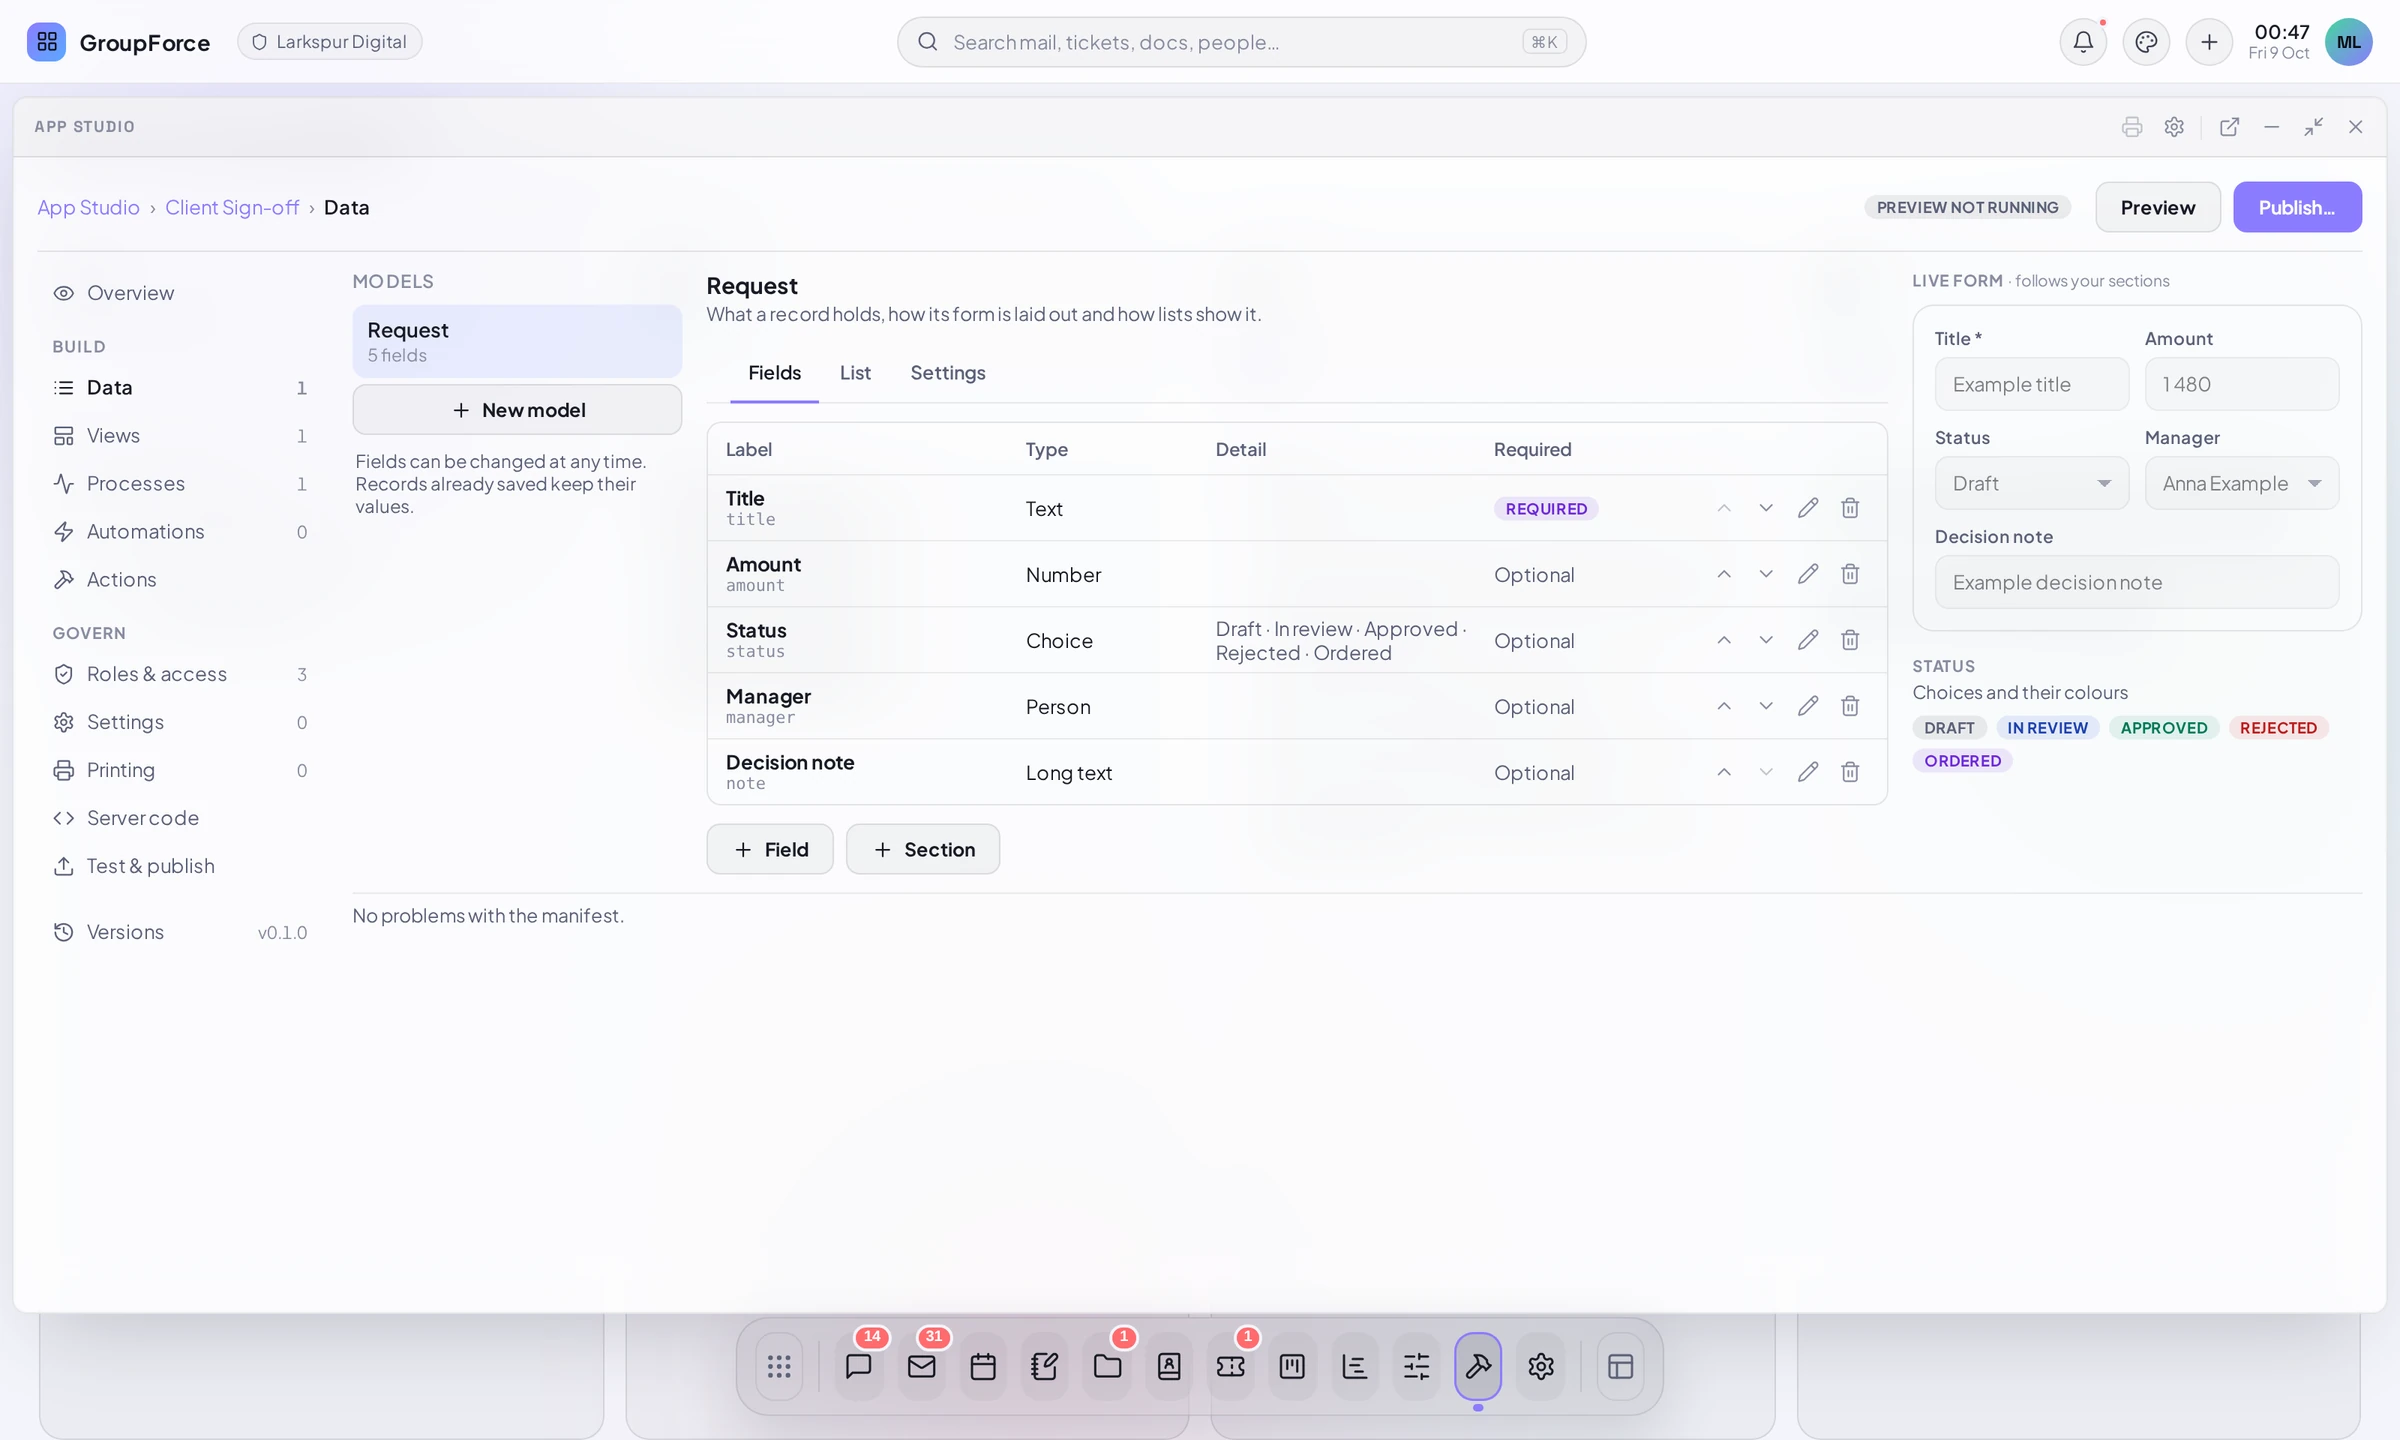
- Click the Settings tab. Under Names, set Label to Deliverable and Plural to Deliverables, then click Save settings. The id of a model never changes, so a model started from the template keeps the id
request; people only ever see the label. - Back on Fields, click + Field and add Client: choose the type Link to record, then under Links to choose contact (built in). Click Add field. The field becomes a picker of Contacts (Data, views and the visual editor).
- Add Due of type Date. Edit Manager with the pencil and change its label to Reviewer (its type stays Person), edit Decision note and change its label to Feedback, and delete Amount with the bin: a deliverable has no amount.
- Open the List tab and, under Columns, choose the fields a list shows next to the title (at most four): Status, Client, Due, Reviewer.
The field types, sections and the list layout are explained in Data, views and the visual editor. The Status field is a choice, and its choices are the states of the process (the Processes part says so: “The choices of the field that holds the state”).
The example files quoted in these guides name the model deliverable (a model made with + New model, Title Deliverable). Starting from the template as above gives the same labels and a model with the id request; the field keys of a relabelled field stay as the template made them (manager, note), where the example files use reviewer and feedback. Only the ids differ; what people see is the same.
Look at the process
Open Processes. The template’s process is already there: states drawn as boxes in timeline bands, and the steps that move a record between them drawn as arrows and listed as cards below. Only a step changes a record’s state, and each step says who may take it and who is told.
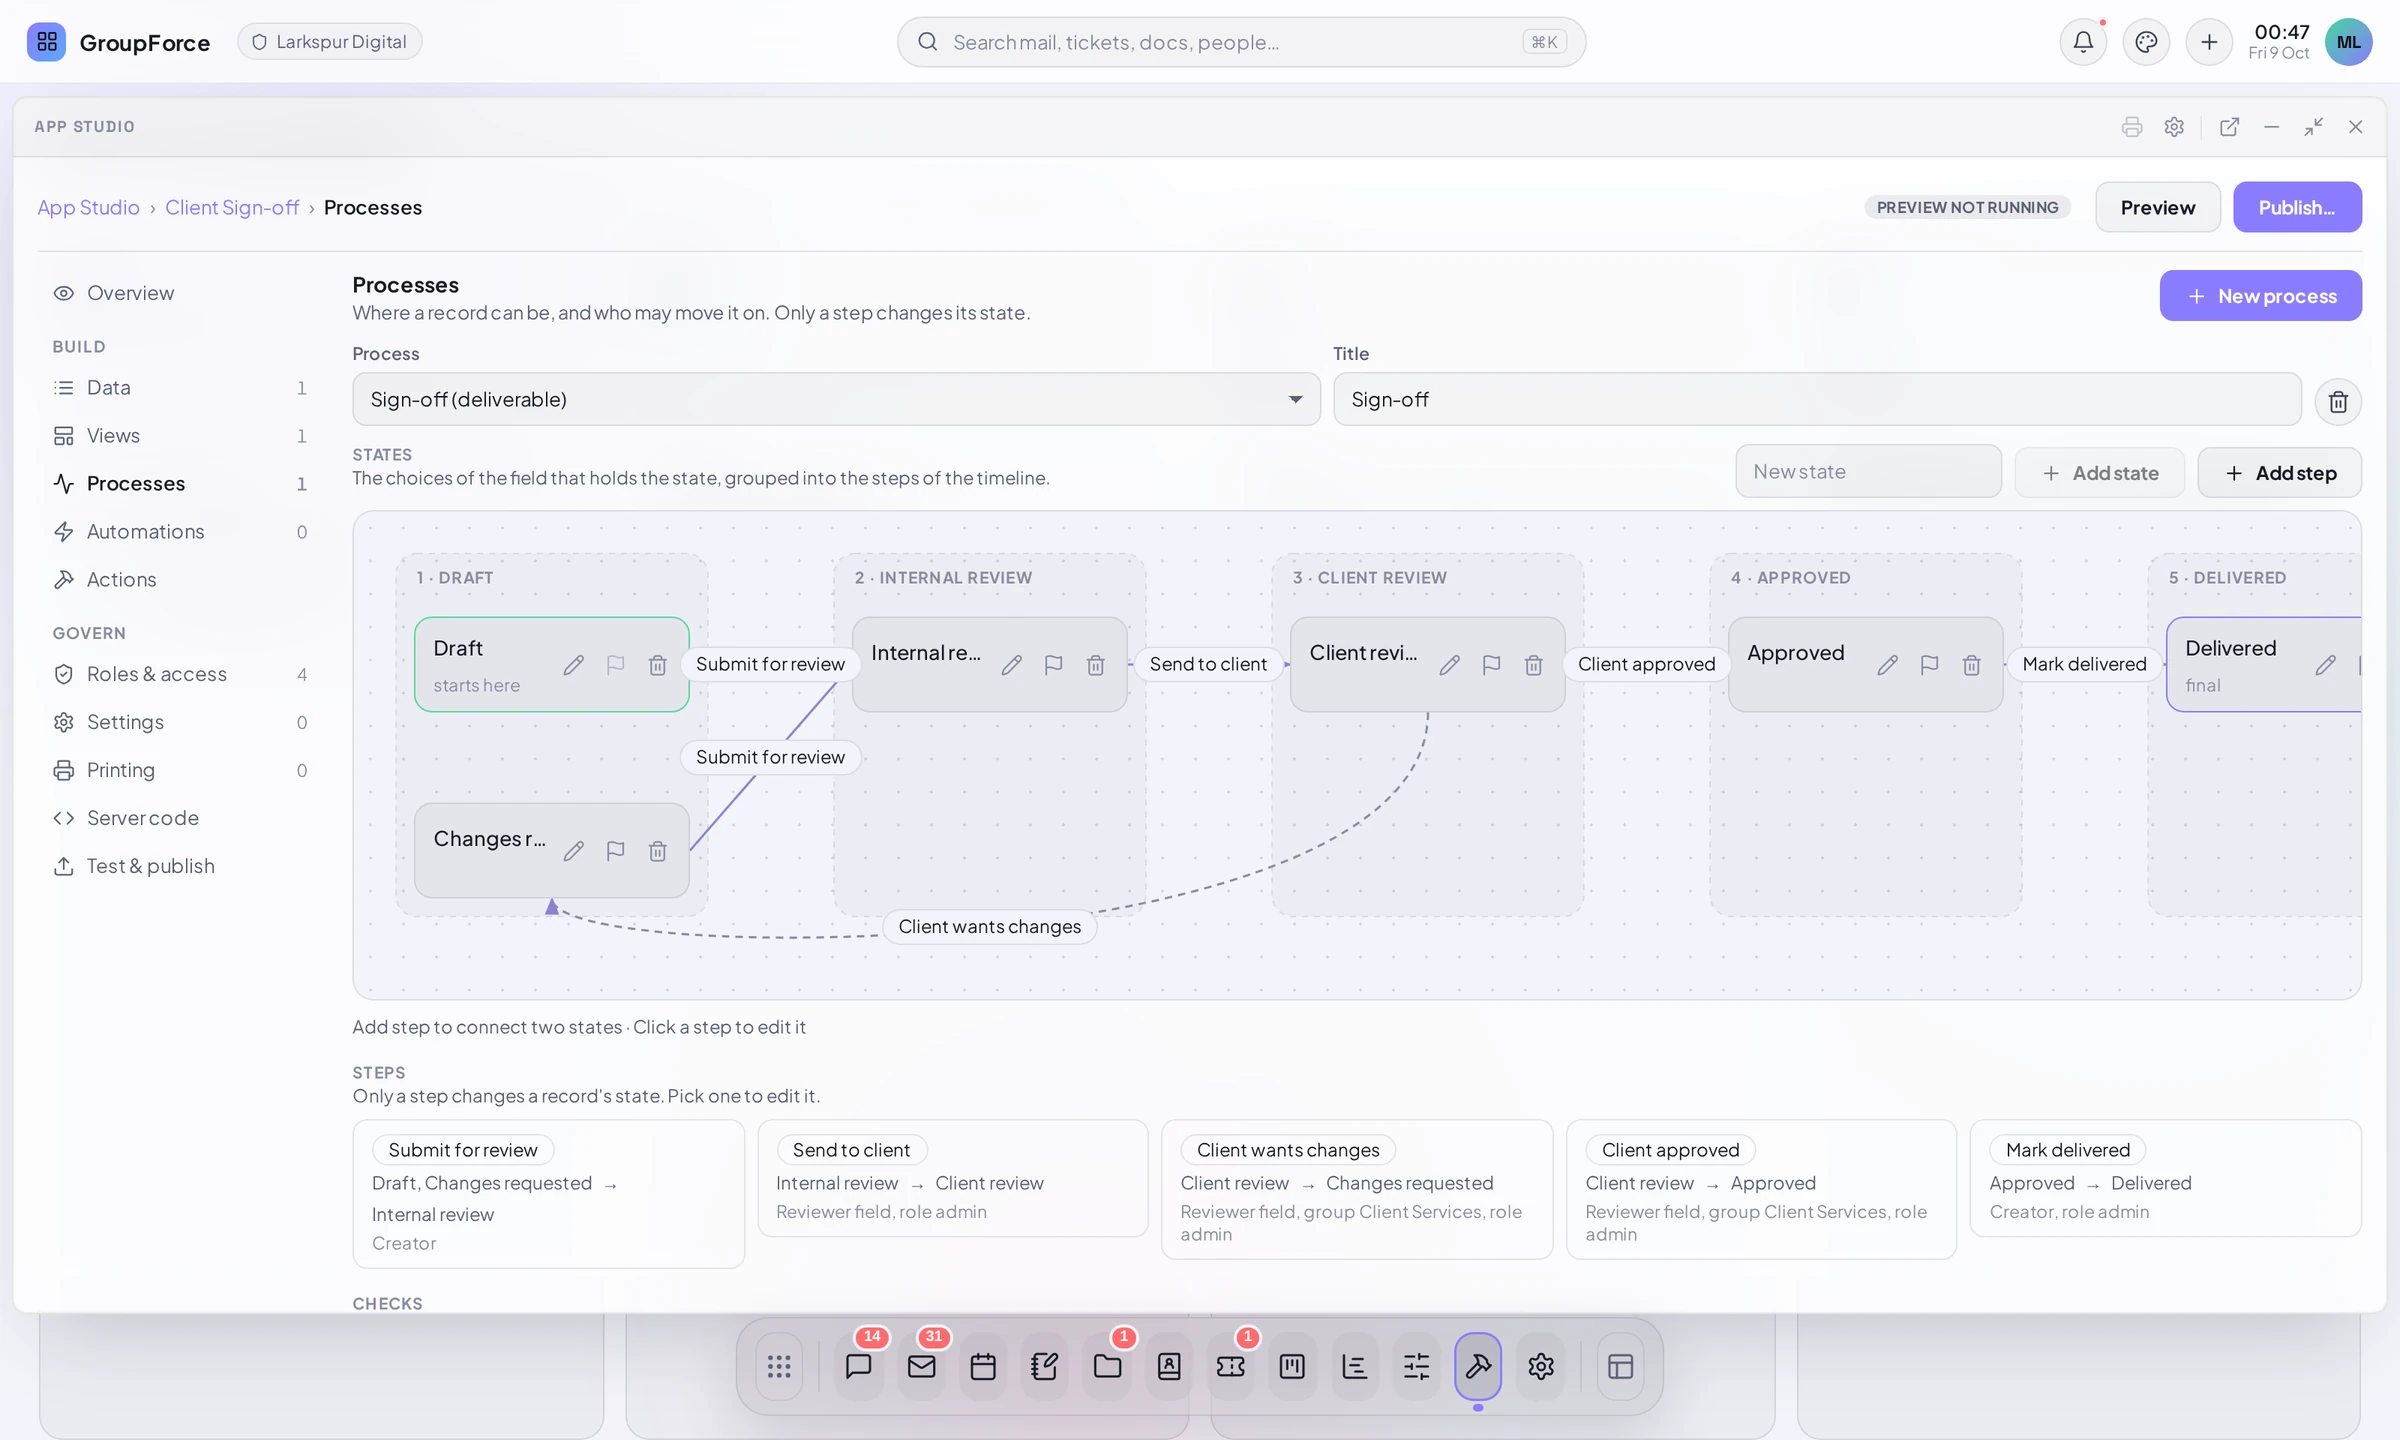
For this first run, leave the process as the template made it. To reshape the states, give a step a rule such as “The due date is already past” or name the groups who decide, follow Processes, roles and automations.
Make a view without code
- Open Views. The template brought a view; if you want the one built from your model, click New view.
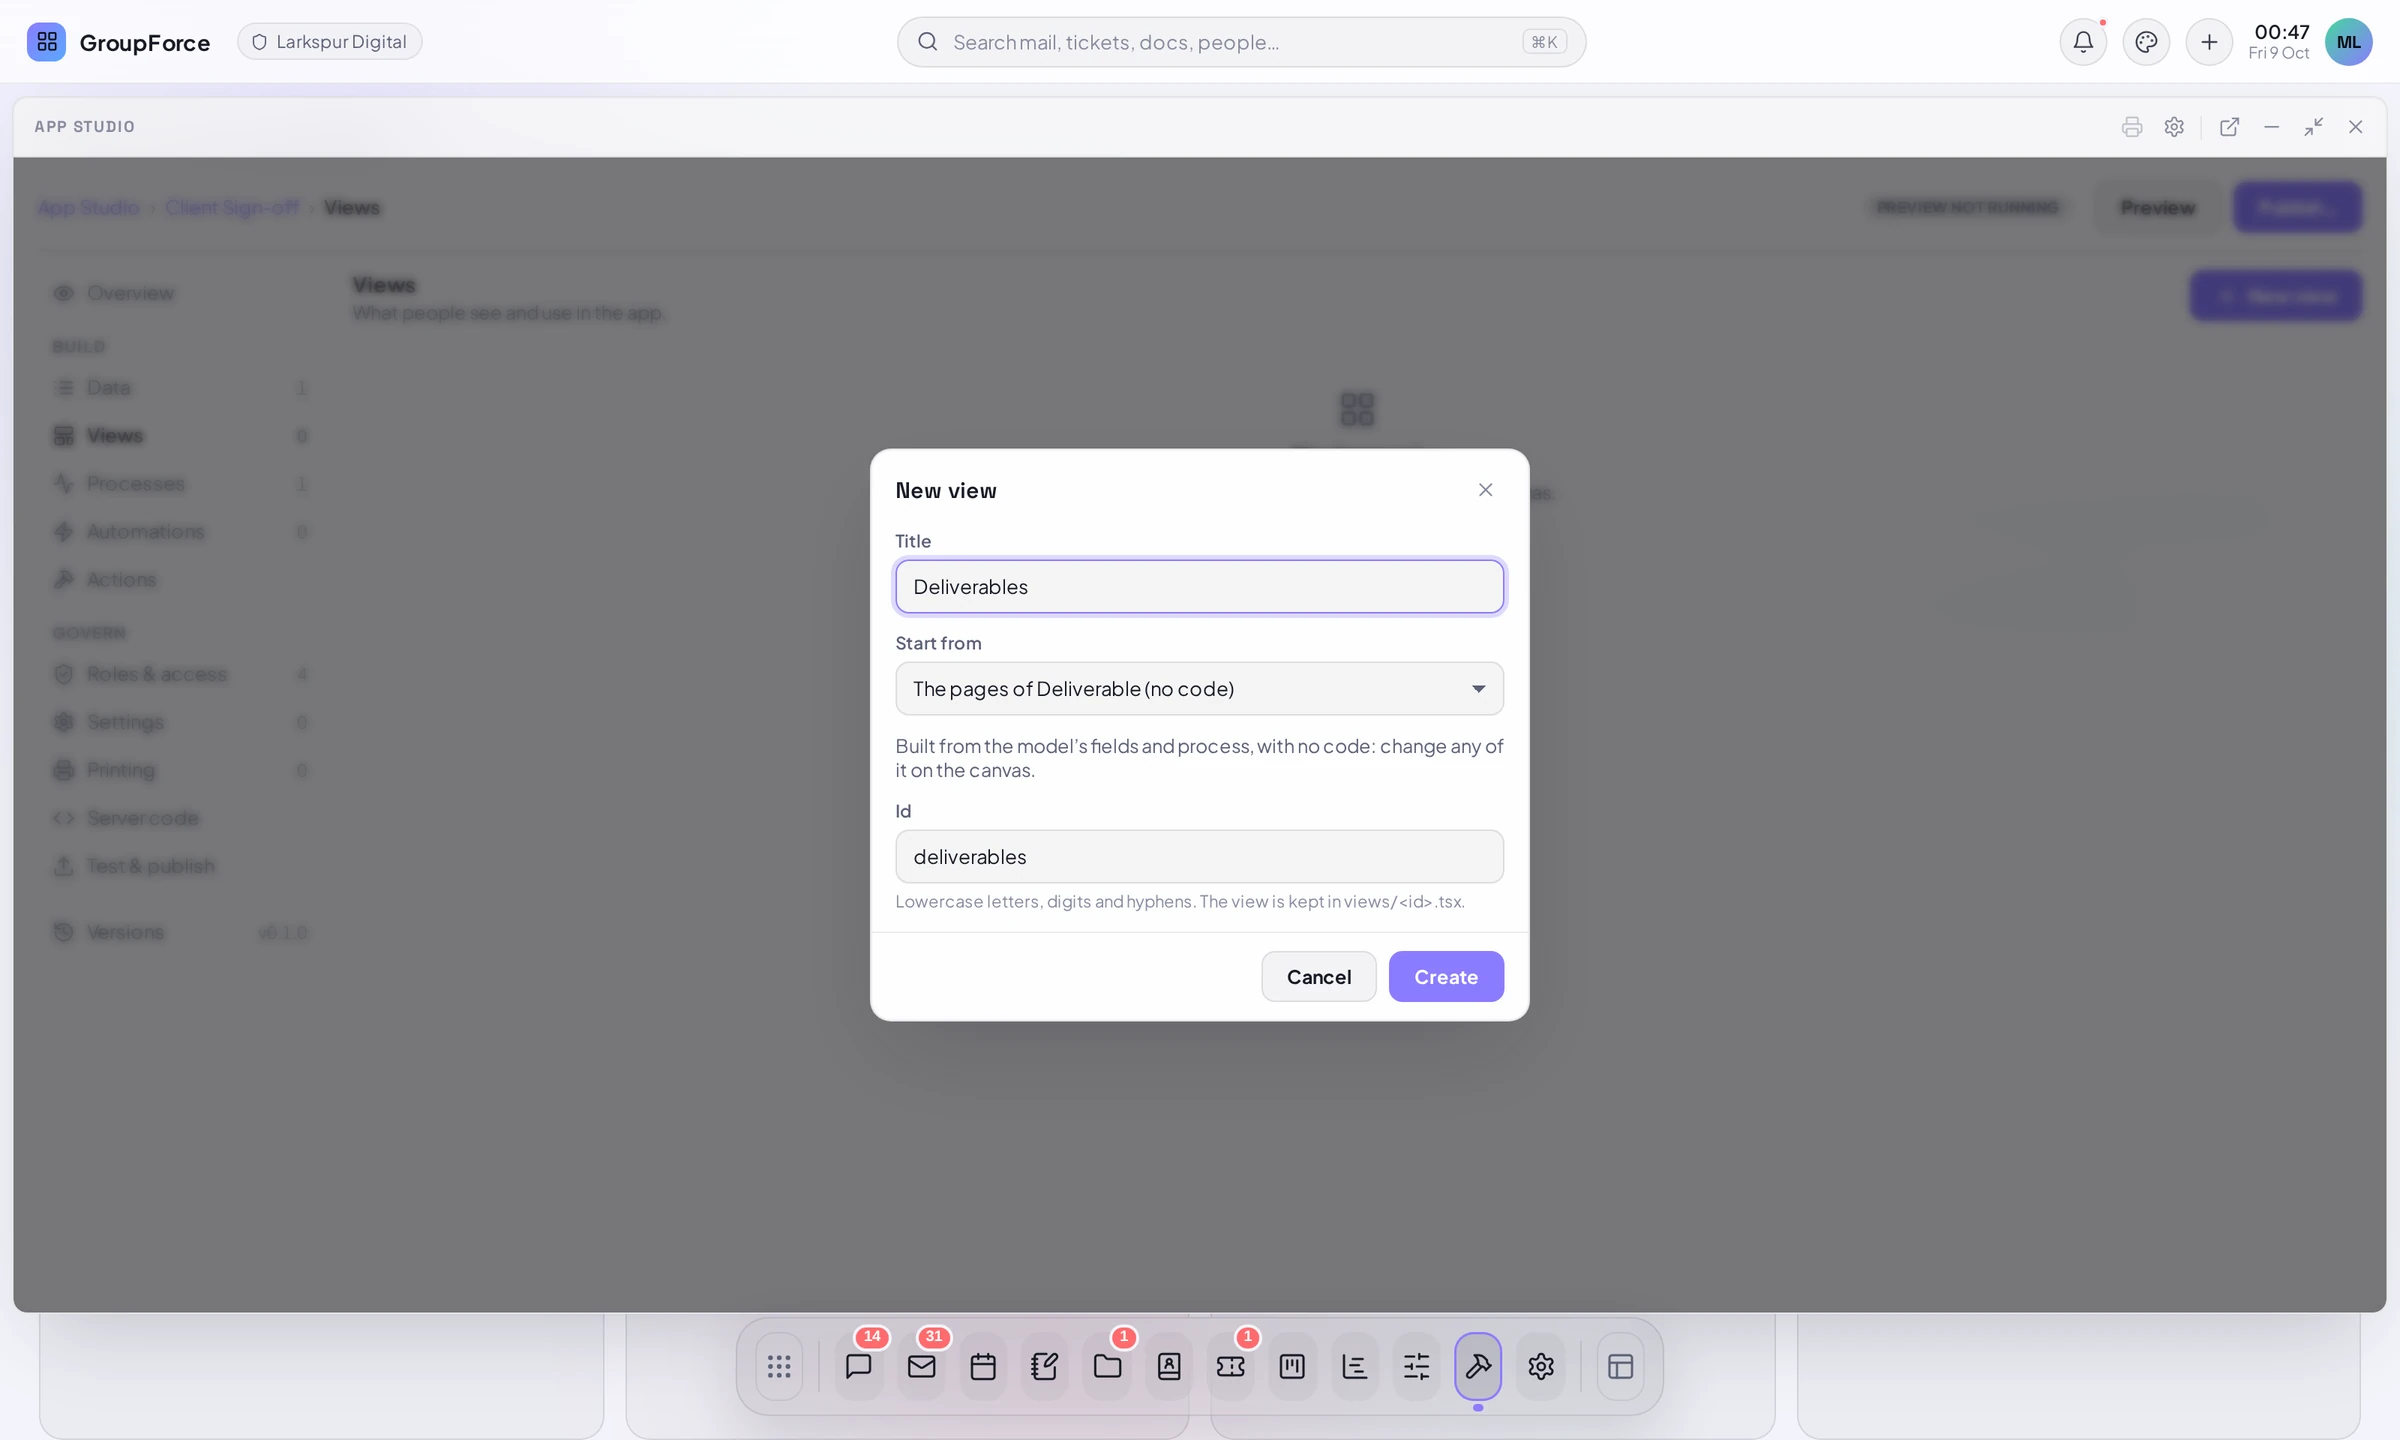
- In New view set Title to Deliverables. Leave Start from on The pages of Deliverable (no code): “Built from the model’s fields and process, with no code: change any of it on the canvas.” The Id (
deliverables) names the fileviews/deliverables.tsx. Click Create. - The new view appears as a card with a COMPILES pill. Use its … menu, Make home, to make it the view the app opens, and Delete on the template’s view if you do not want it.
- Click Edit to open the visual editor, look at the list page and the record page it drew, and press Esc (or click Exit) to come back.
The editor, the blocks and what to do when a view needs more than blocks are the subject of Data, views and the visual editor.
Run it in a preview
- Open Test & publish.
- Under PREVIEW click Start preview. App Studio installs your draft into a preview slot of your own, on test data, signed for you with a development certificate that lasts 24 hours.
- Click Open preview. The app opens in its own window, titled <App> (preview). Click New deliverable, fill in the fields, save, and take the steps the buttons offer.
- Back in App Studio, Recent runs shows what the app’s automations did and Notifications delivered to you lists what was sent to you from the preview.
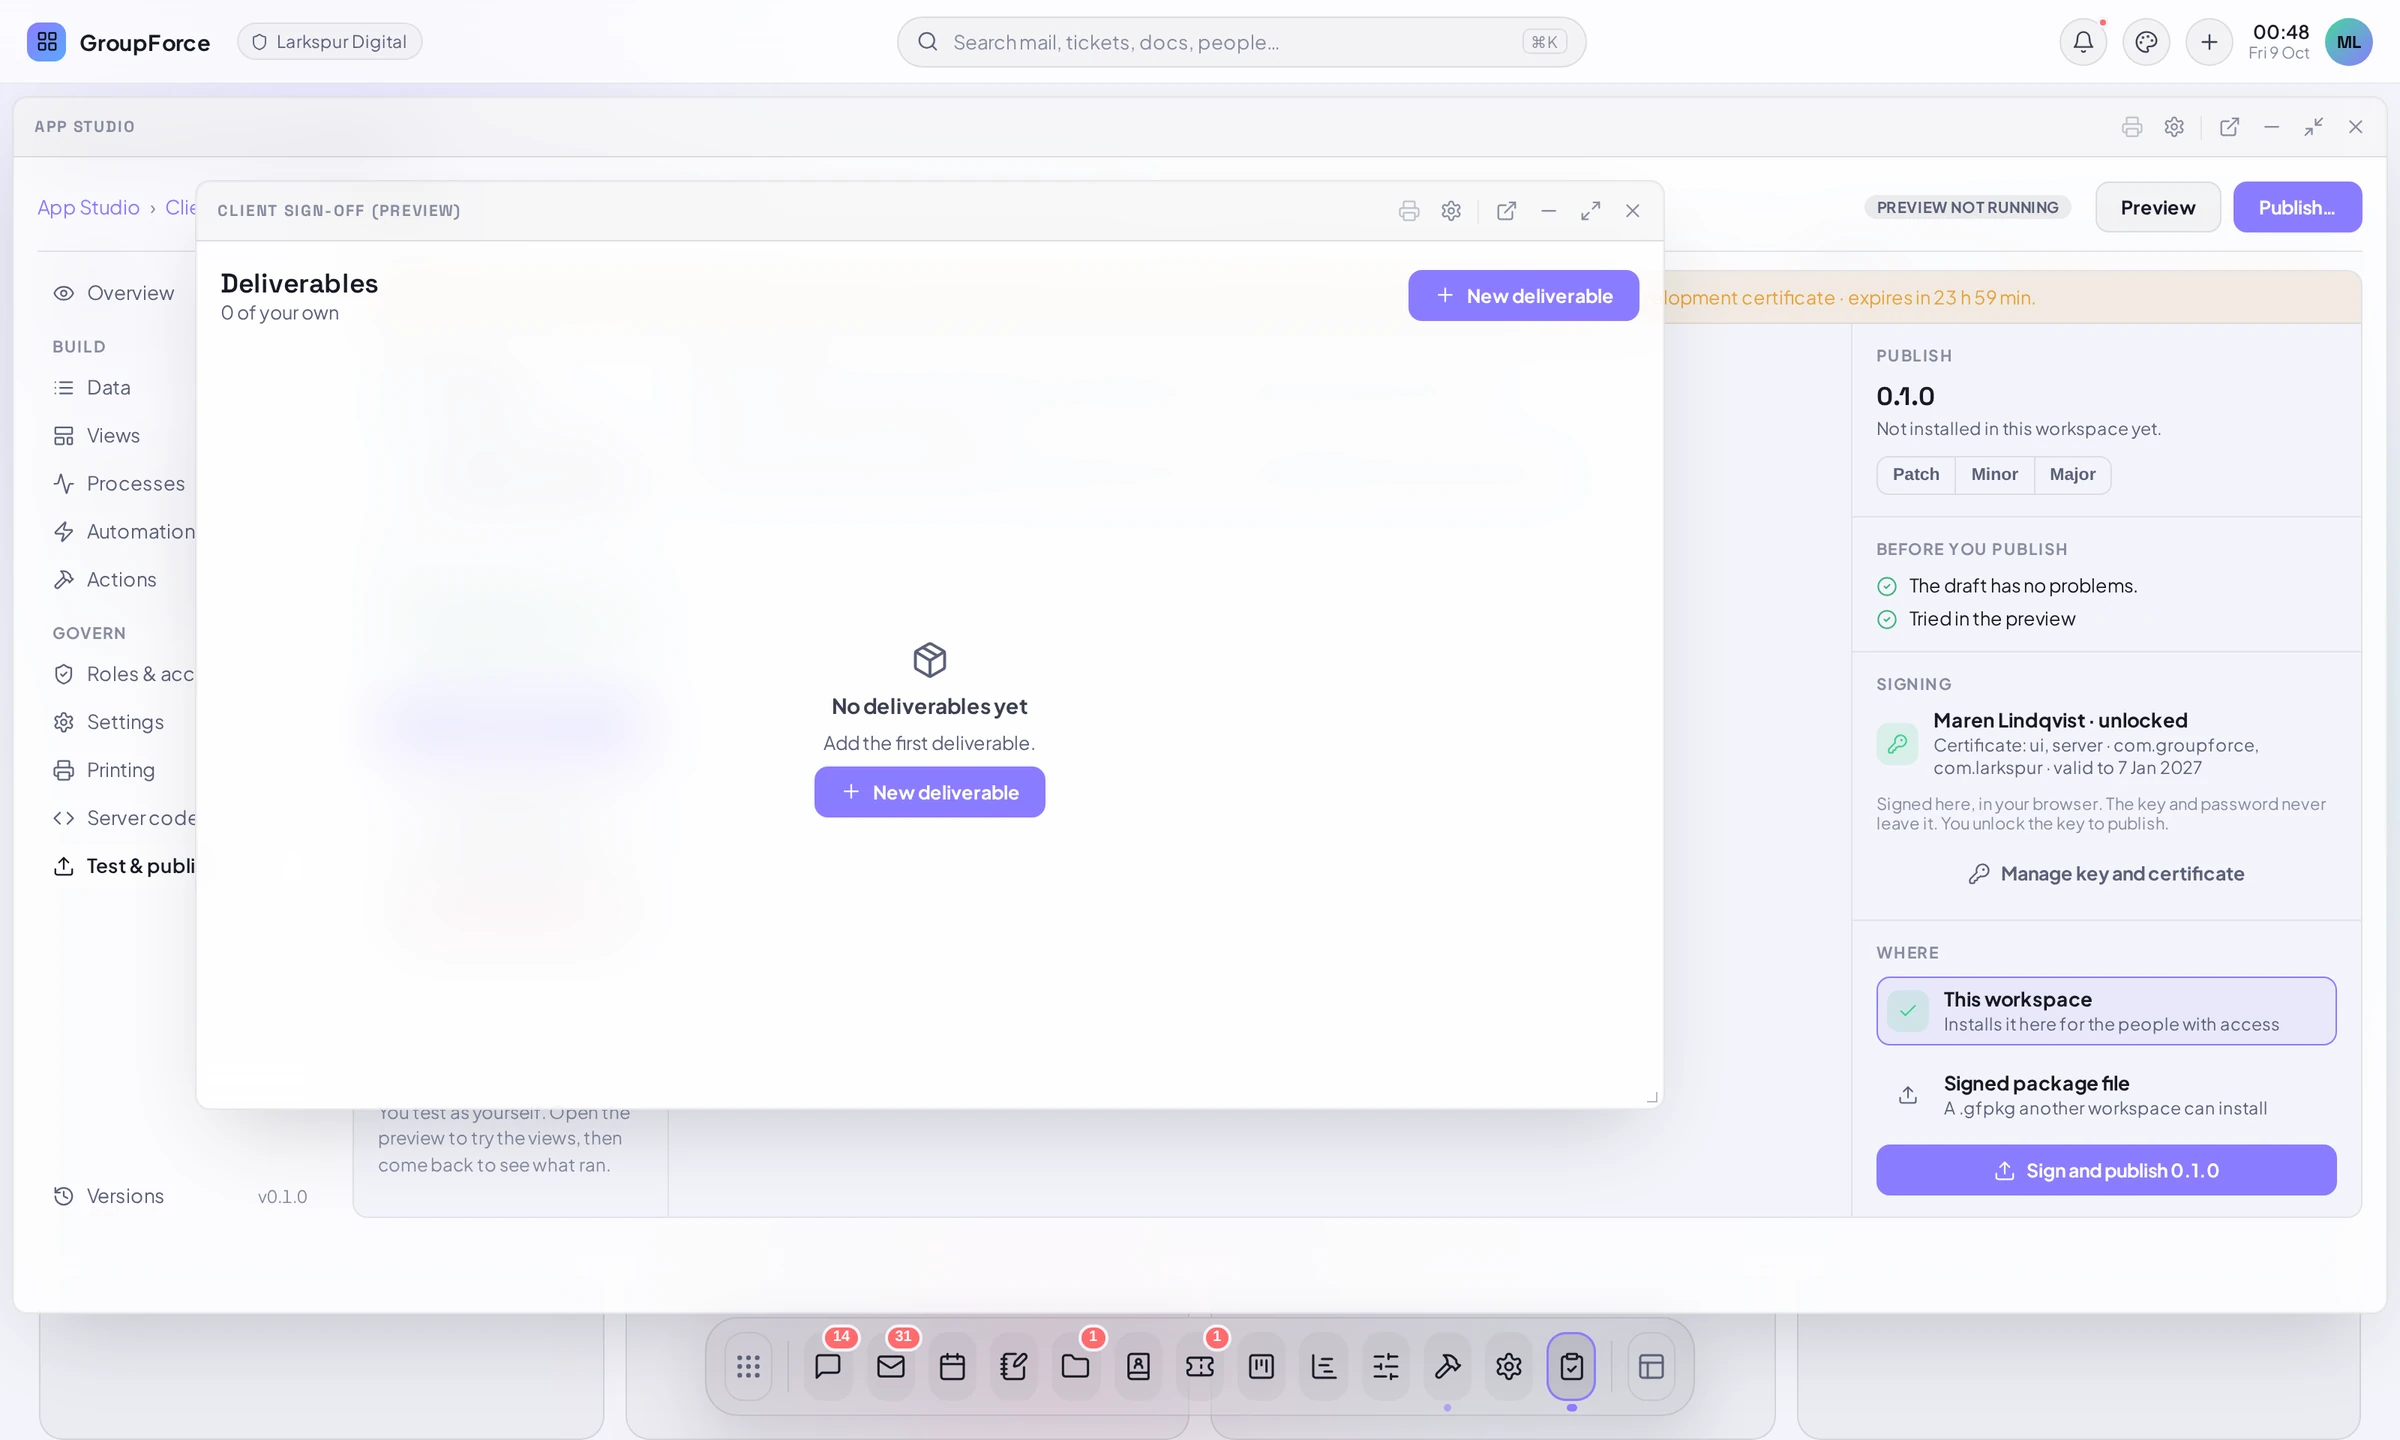
- A preview is visible only to you. Nothing in it reaches real records, mail or people. Notifications sent from a preview reach only you and are titled “[Preview] …”.
- You test as yourself, not as another person. Reset test data empties the preview’s records and Remove preview takes the slot away; Update preview (the button’s name once it is running) puts your latest changes in.
- Server code runs in a preview only when your operator has turned on isolated server-code execution.
- Start preview is available once this browser has a publishing key. A preview needs only the first step of the key page (Create the key); the key, the certificate and signing are in Test and publish from the Studio.
What you have at the end
- A draft app with the id
com.larkspur.client-sign-off, version 0.1.0, which exists only in your workspace and is saved as you edit. - A model with typed fields and a list layout, a process with steps and states, and a view built from blocks with no code.
- A running preview of all of it on test data, in a window of its own.
Nothing is installed for other people yet and nothing is signed. The same draft can carry on in three directions: Processes, roles and automations (roles, rules, automations), Test and publish from the Studio (preview in depth, the key, signing and publishing) and, when a view needs behaviour blocks cannot give, Your first app in code. What the manifest sections mean is in What an app is made of.